Easy Sheet Pan Caramel Apples (Slices)
Sheet Pan Caramel Apples are the ultimate fall dessert! Made with thin apple slices, caramel dip, and all your favorite toppings … this fun version of the classic treat has the same delicious taste, without all of the hassle. It’s easy to make, super customizable, and perfect to serve a crowd at any fall gathering.
Check out some more favorite fall treats too! Like Cream Cheese Caramel Apple Dip and Pumpkin Spice Sugar Cookies.
Why You’ll Love Caramel Apple Slices
This sheet pan sweet treat is a delicious take on the beloved caramel apple. It transforms the classic recipe, a big whole apple on a stick wrapped or dipped in caramel or toffee, into a munchable, snackable, and shareable platter.
It consists of perfectly crisp, tart apple slices covered in a rich, indulgent caramel sauce finished with colorful and delicious toppings. Not only is this recipe clearly incredibly delightful, it is also:
- SUPER Easy: This is any recipe by all meanings of the word. But in comparison to classic caramel apples it is super duper easy!! Especially because pre-made caramel dip is used. This perfect treat requires no homemade caramel or dipping into said caramel – no large saucepan, no butter & sugar, no caramel sliding, etc. Just slice, arrange, pour, spread, and top!
- Perfectly Proportioned: My second issue with caramel apples besides their difficulty / frustration level is that there is never enough ooey-gooey caramel for the apple. This recipe solves that problem! Each apple slice is thoroughly coated in caramel and toppings, ensuring that each bite has just the right ratio and is as delicious as possible. A dream come true!
- A Fun Treat: Honestly this recipe just screams fun! That’s all there is to it. Fun to make, fun to enjoy, fun to look at.
- Customizable: Maybe the best part about sheet pan caramel apples is that they are SO customizable! You can add any toppings you can imagine. Read on for all my ideas!

Ingredients & Substitutions
This indulgent treat requires 2 main ingredients! Caramel and apples. An autumn match made in heaven. In my opinion it’s the ultimate apple pairing.
There’s of course the classic cooler weather September through November battle between the fun fall treat options … pumpkin ones or apple ones. But in my head there is also a battle of the apple pairings, caramel apple and cinnamon apple. Caramel wins in my book each and every time! Hence this scrumptious recipe for sliced caramel apples.
If you’re a cinnamon apple type of person though, do not worry I got you covered too. Check out my Cinnamon Apple Banana Muffins, Air Fryer Apples, or Mini Apple Cider Donuts.
Anyway, back to it! Besides the two stars of this show you will also need a whole lot of toppings. Toppings, toppings, and more toppings.
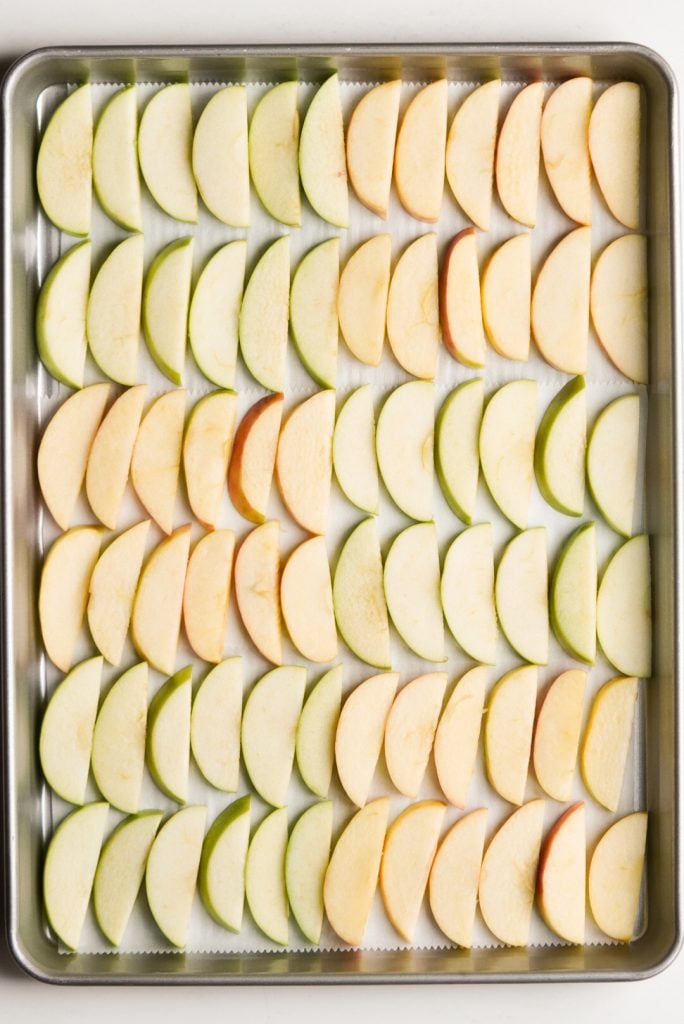
- Apples: First and foremost, this fantastic recipe requires a handful of large apples. About 4 or 5. I used Honeycrisp and Granny Smith, but really any type should do the trick.
- Caramel: Next you will need caramel. What makes this recipe extra fabulous is that it requires store bought caramel dip! Talk about easy. Any brand should work, I like both Marzetti and Litehouse. You will need 1 cup in total.
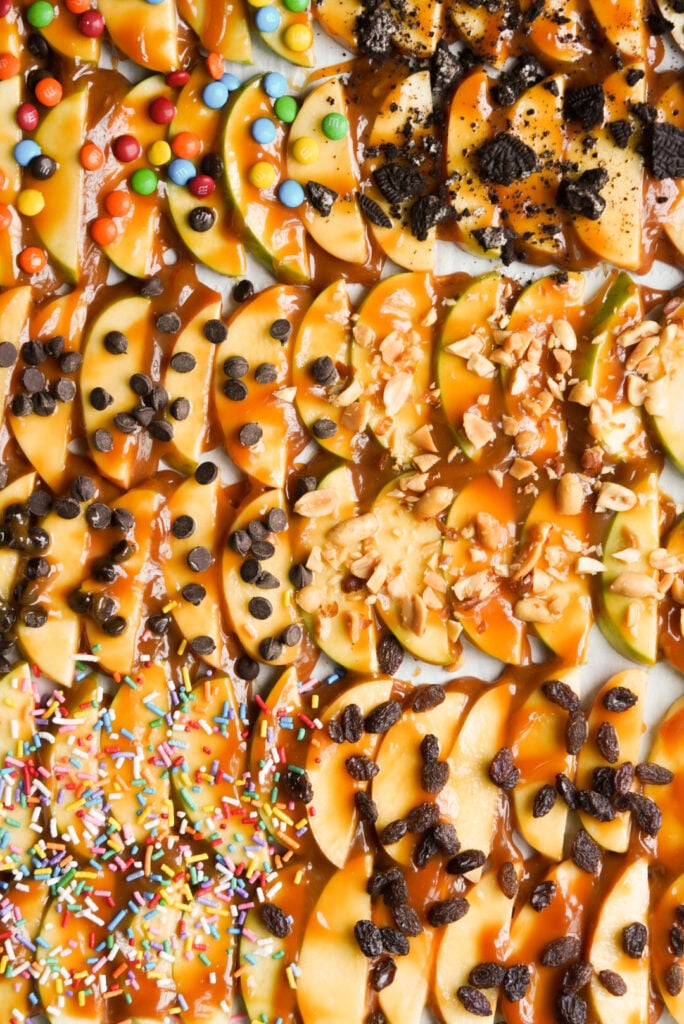
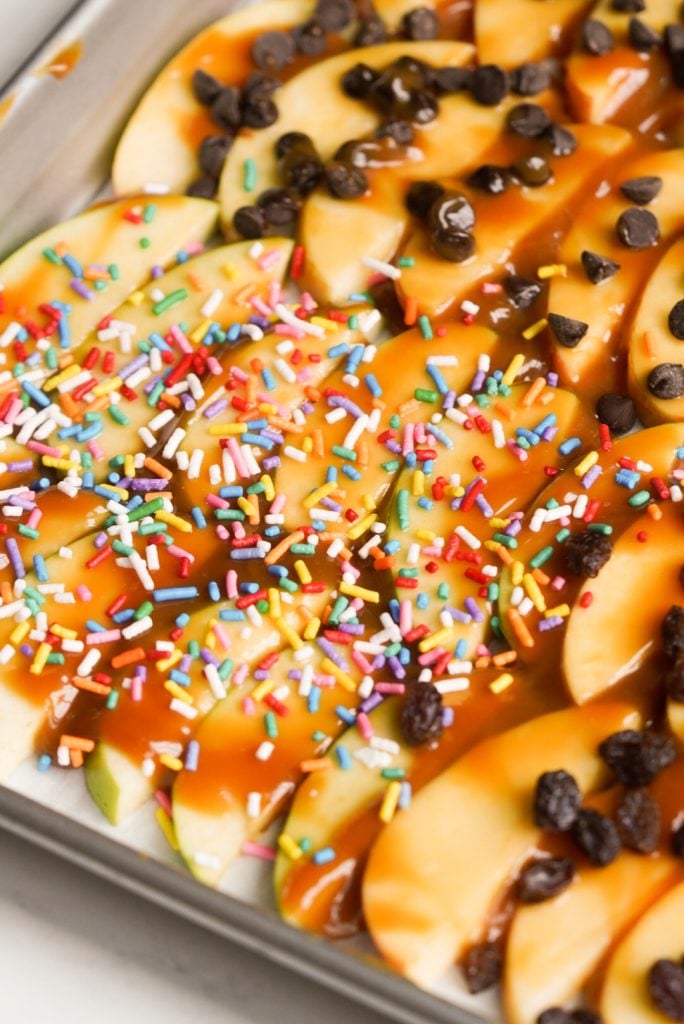
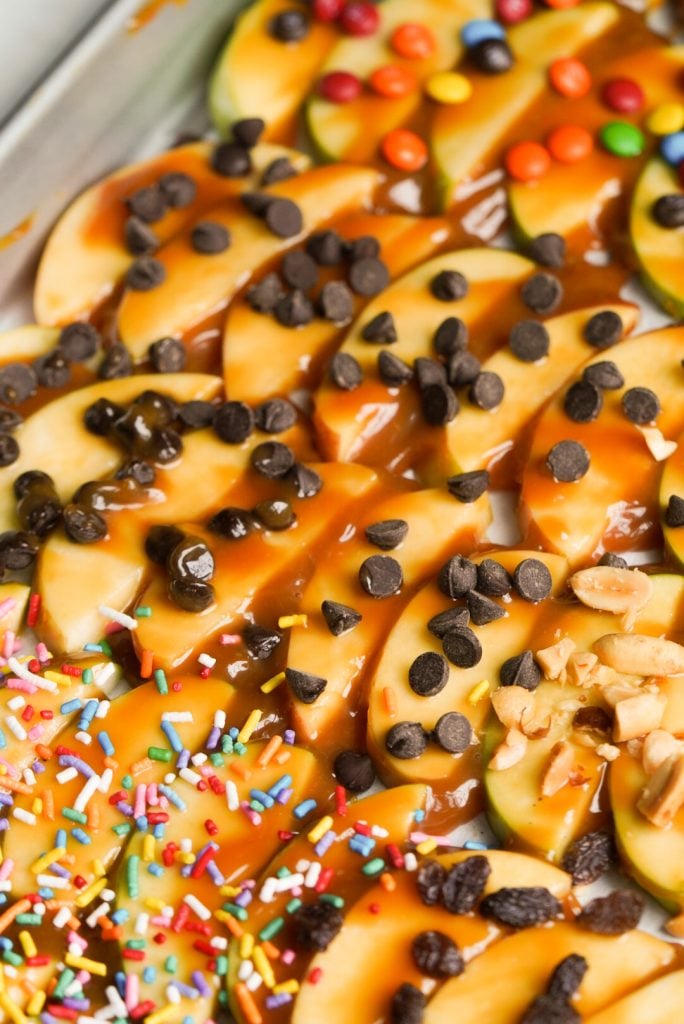
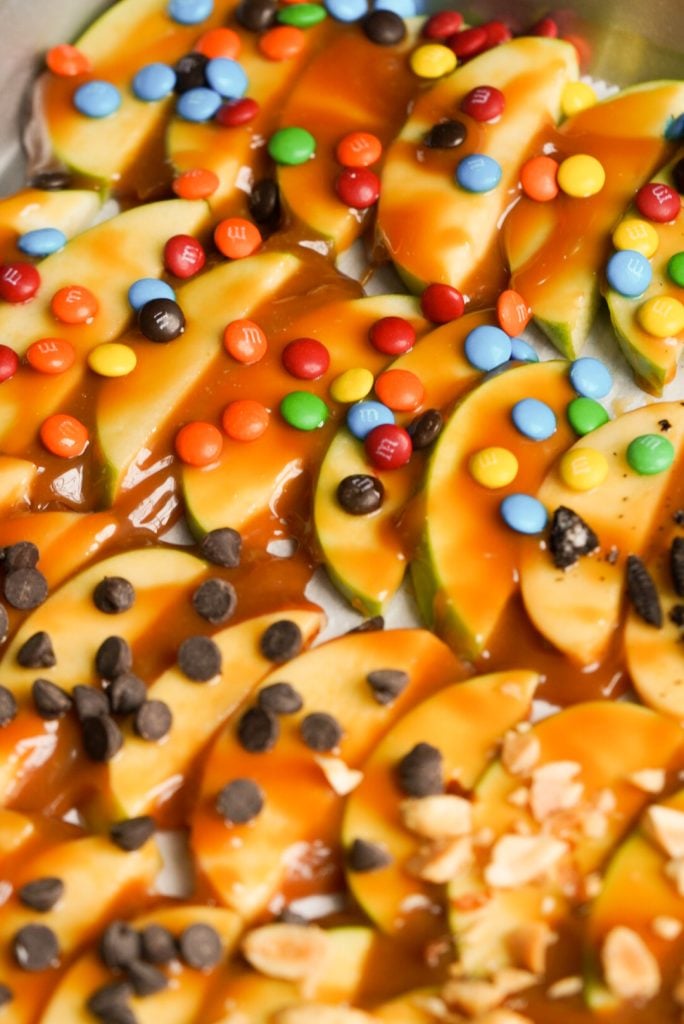
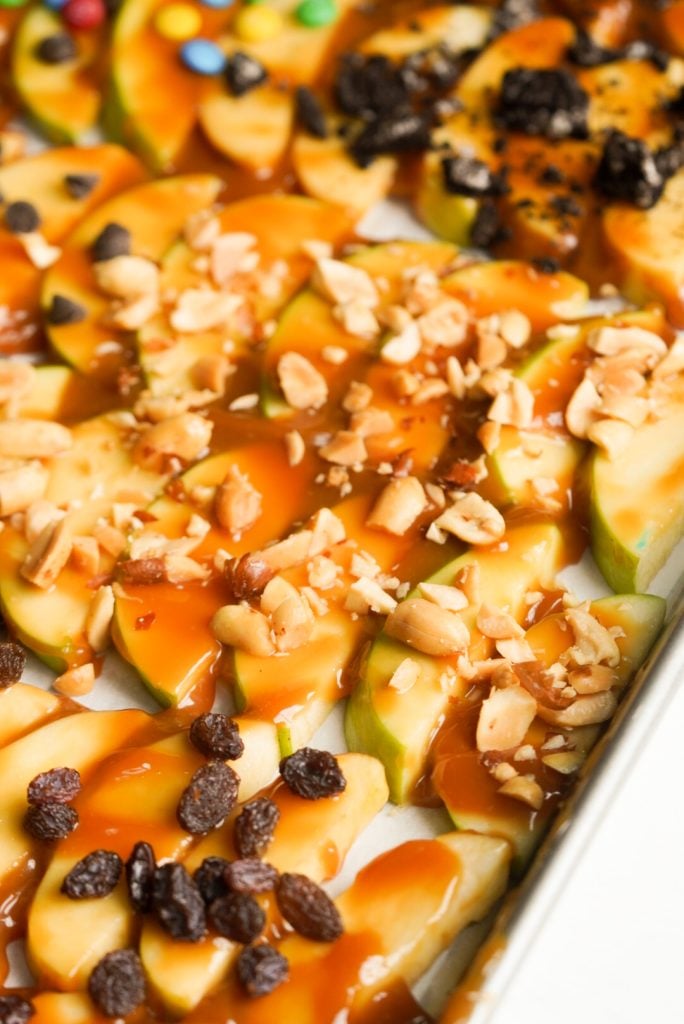
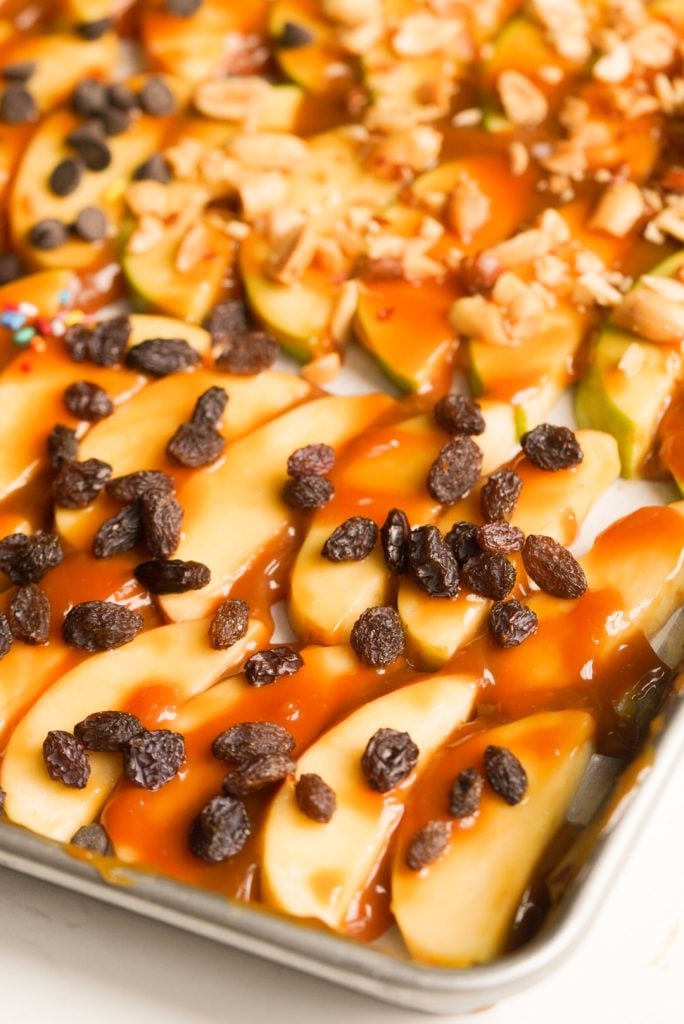
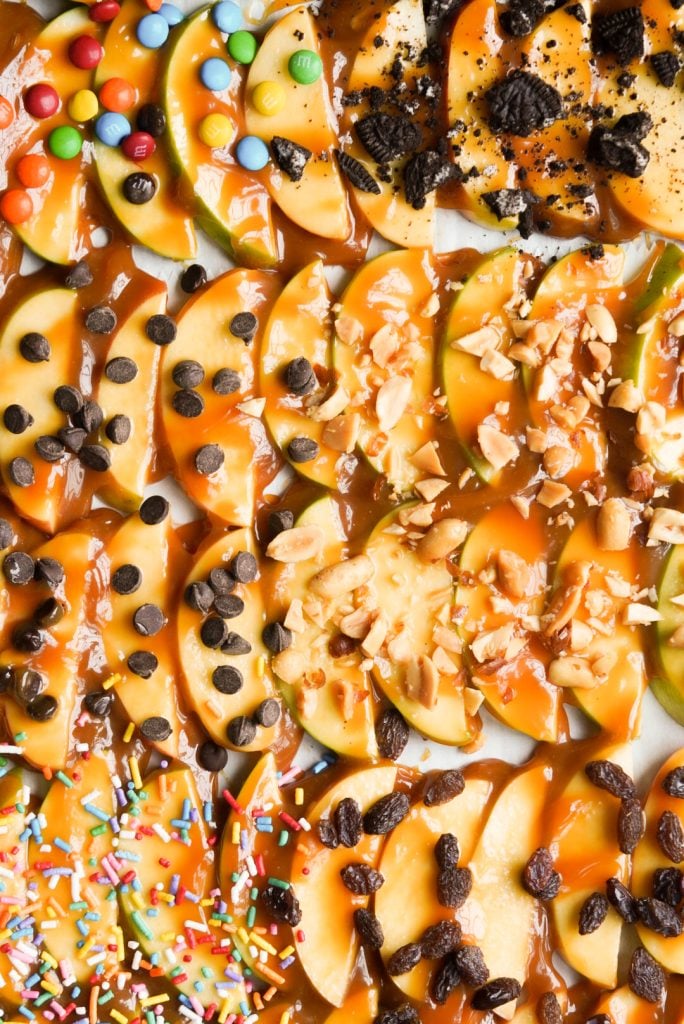
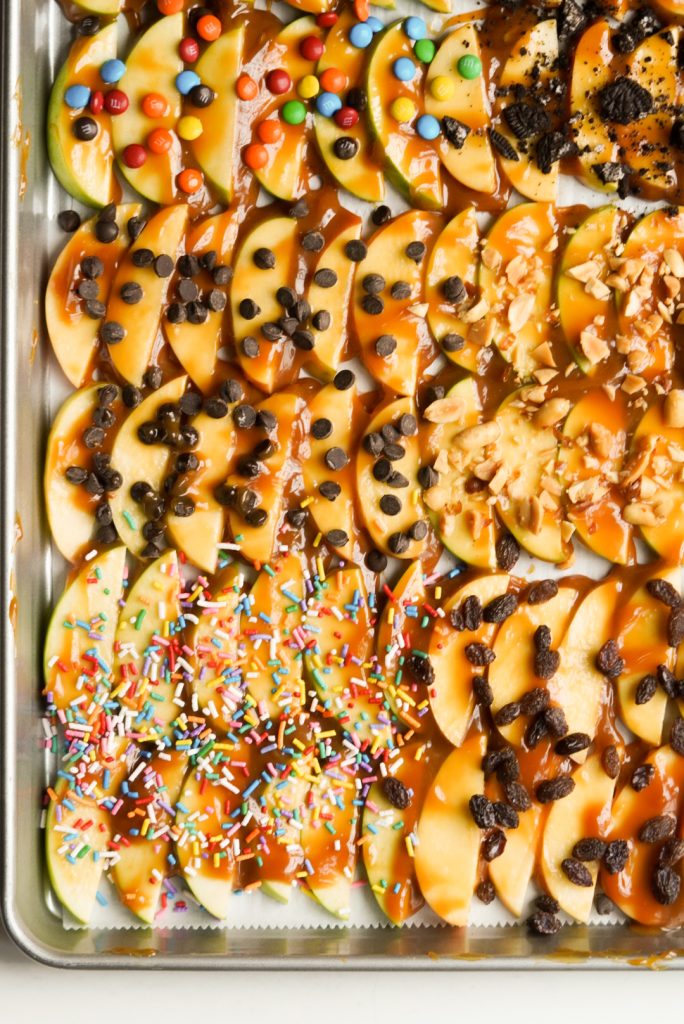
- Toppings: Now for the fun part – the tasty little bites on top of the caramel apple slices. I chose 6 different ones! First I went with some classics, semi-sweet mini chocolate chips and rainbow sprinkles. Next I wanted some salty, so crushed peanuts worked wonders. For extra fun, I did mini colorful M&M chocolate candies and crushed Oreo cookies. Lastly, to show you could keep your toppings on the healthy side I went with raisins. They were all excellent choices, but there are endless additional ones you could choose from. Read on for all my ideas!

Equipment Needed
This post contains affiliate links. As an Amazon Associate, I earn from qualifying purchases.
- Cutting Board & Chef Knife
- Measuring Cups / Spoons
- Sheet Pan (mine was about 16″ x 11″)
- Parchment Paper
- Silicone Spatula
How To Make Sheet Pan Caramel Apples
A caramel apple tray is such a fun and easy treat to make! Especially during the spooky, sweater weather time of year. This sliced apple, multiple serving version of the classic fall favorite, traditional caramel apples, is superior in so many ways.
It’s easier and more convenient to enjoy, but most importantly, a delightful activity to prepare. No candy thermometer, no toppings falling off, and definitely no worrying about your caramel sticking to the apple.
Now who wants that headache, when you can have caramel-coated apple slices that taste just the same? Or better! The topping to apple ratio is way more to my liking over here too.
Now that we’ve rambled enough! Let’s get into the nitty gritty:
Step 1: Slice apples. First thinly slice the apples with a sharp knife. I like to use this method of cutting apples to get flat slices.
Step 2. Arrange slices. Next line a large sheet pan with parchment paper. Add the apple slices to the sheet pan in neat rows. I squeezed as many slices as I could on to the baking sheet, 6 down and 12 across.
Step 3: Warm caramel sauce. Then add the caramel dip to a microwave safe bowl. Heat in 15 second intervals, stirring between each one, until the caramel reaches a pourable consistency. Don’t heat too quickly.
Step 4: Pour & spread. Pour the caramel over the sliced apples. Next use a spatula to gently spread it evenly over all of the apples. You have to be delicate here or the apples will be flipping and sliding all over the place.

Step 5: Add desired toppings. Once the caramel is spread, add all of your favorite toppings. I separated the sheet into 6 different sections for 6 different toppings – mini M&Ms, crushed Oreos, chopped peanuts, chocolate chips, rainbow sprinkles, and raisins. Add however much of each you’d like. Check out my full post for more delicious topping ideas.

Step 6. Chill before serving. Place the sheet pan in the refrigerator for 15-30 minutes before serving. This will solidify the creamy caramel sauce a bit and chill the apple slices.
Step 7: Serve and enjoy!

Additional Topping Ideas
One of the best things about this sweet caramel sheet pan is that you can customize it to no end! You could throw anything and everything you want on top of the apples and it is almost guaranteed to be delicious.
- Chocolate Chips – This most classic topping has lots of variety. You could go with white chocolate chips, milk chocolate chips, or dark chocolate chips.
- Crushed Nuts – Love the peanuts here? Add walnuts, almonds, or cashews too.
- Candy – If you are a die hard sweet tooth (me!) candy will be your ultimate topping choice. Try chopped KitKat, Snickers, or Reese’s Cups. Or any leftover Halloween candy! Candy corn would be a festive option as well.
- Cookies – Again, this is for the sweet lovers. I recommend you find any cookie in your house and crumble it on top. YUM. Better yet, bake a fresh batch of Brown Butter Chocolate Chunk Cookies and crumble that.
- Salty – My dad absolutely loves the peanut portion of this caramel apple slices sheet pan. If you are on board that salty sweet train too, you are sure to love some other salty topping options. Perhaps pretzels, popcorn, or even potato chips.
- Fruit (Dried or Fresh) – For a healthier take, go for fruit. For dried you could do craisins, apricots, or mango. On the fresh side, I think berries would be great.
- Apple Pie – Make an apple pie flavor with a sprinkle of brown sugar and cinnamon on top. Sounds amazing!
- Sprinkles – Go classic with rainbow or chocolate sprinkles! Or use different color combination for different celebrations – sports games, girl’s night, scary movie watch party, or Halloween party.
- Swirls – I did not add any swirls or drizzles to my variation of this sheet pan sweet, but they would be a great way to add some extra flavor. Try peanut butter, Nutella, or melted chocolate!
It’s sort of like caramel apple nachos! The apples are your canvas for anything you can think of to pile on,
Expert Tips
Spread the caramel carefully on top of the apples. If you move too quick the apples will flip and slide all over, creating a caramelly mess. Now this would be a delicious mess, but a mess all the same!
Line the sheet pan with parchment paper. Again, we are dealing with caramel here which is inherently messy. Lining your pan with parchment paper will keep the pan itself relatively clean and you won’t have to worry about scrubbing and scraping away later. All you’ll have to do is toss the parchment paper!
I recommend chilling these easy caramel apple slices before serving. You’ll get nice and thick ooey-gooey caramel and crisp cold apples. A perfect combination! You can of course enjoy these apples right away at room temperature. I won’t lie I did try ’em out, before popping them in the fridge, and they were already scrumptious. But chilling most definitely enhances that scrumptiousness!
Half the recipe if you’re not serving a large crowd. A whole batch of this recipe produces a lot of servings. If you don’t need that much simply use a baking sheet that is smaller than a typical half sheet pan (18″ x 13″) and maybe only 2-3 apples.
Serving Suggestions
These homemade caramel apples are perfect to make for so many situations! They’re the ultimate fall dessert.
- Fall Gatherings: The first great way to serve this recipe is at pretty much any and every fall gathering you attend. School party, sports game tailgate, bonfire, pumpkin carving party, game day, etc. Everyone is sure to devour it!
- Halloween or Thanksgiving: Talk about the premier fall gatherings … Halloween and Thanksgiving! I pretty much can’t think of a better holiday treat than this caramel apple platter. You could even add toppings on theme with the holiday. How fun!! Halloween Rice Krispie Treats, Reese’s Peanut Butter Cup Dip, or Maple Glazed Pumpkin Bread would make good seconds at the dessert table too.
- Fun Kid Activity: I just know my little cousins would have an absolute blast making this recipe. They would go crazy with the caramel, candy, and chocolate! My kitchen would probably end up in a disaster, but I think it would be well worth it. Think of all the memories!
- Date Night: Because adults like caramel and candy too! I think preparing these sliced caramel apples would be such a fun date night activity to do with your partner. Once it’s ready to go, cuddle up on the couch, turn on Halloweentown or a scary movie, and you’ve pretty much got yourself the perfect October evening.
- Girls Night: Pair this caramel apple board with some festive cocktails for a fabulous fall pre-game to a girl’s GNO or GNI. Girls night in?? You know what I mean. Serve pizza for dinner and these for dessert and everyone is bound to have a good time.

FAQs
You can use any type of apples you’d like in this recipe! Some people think that tart apples go best with caramel, but I personally believe that all are fabulous.
I used a combination of granny smith apples and honeycrisp apples. I love using a mixture of colors – green, red, and yellow – for the prettiest spread!
This recipe calls for caramel dip! This is pre-made, packaged caramel that you can find in most grocery stores near the apples in the produce section. Here is the exact one I used! It is absolutely the easy way to go about making this fall-time treat.
However, you do have other options! You could use caramel bits and heavy cream to make an easy caramel sauce. Or you could go even bigger, bring out the butter and sugar, and get to work making buttery caramel from scratch!
This recipe is 100% best when enjoyed the day it is made! Honestly within 1-2 hours of it being made. If serving, I would not recommend storing for any length of time beforehand. Simply chilling the tray and then bringing out!
However, if it is just you and your immediate family enjoying leftovers of these caramel apples, I would say they store quite well for what they are! Simply wrap up the tray in some plastic wrap and place in the fridge.
You should be able to munch on the apples for 1-2 days after. Sure, the toppings might get a little soggy and the apples a little juicy – but that does not stop me from indulging in the sugary treat!
Related Recipes
More Apple Recipes
- Easy Crescent Roll Apple Cobbler
- Apple Pie Overnight Oats
- Caramel Apple Crisp Ice Cream
- Baked Apple Cider Donut Holes
- Cinnamon Apple Banana Muffins
- Healthy Apple Crisp
- Cinnamon Apple Pie Granola
More No-Bake Recipes
- Berry Protein Powder Popsicles
- Pumpkin Protein Balls
- Cream Cheese Chocolate Chip Dip
- Small Batch No Bake Cookies
- Chocolate Strawberry Yogurt Clusters
- Strawberry Cottage Cheese Ice Cream
- Dark Chocolate Berry Bark
Connect With Me!
If you make this sliced caramel apple recipe or any of my other recipes, I would absolutely love to know! Tag me @wellnessbykay on Instagram so I can see and share your recreations.
Love this recipe? Leave a comment and a rating! I love to see and it helps me continue to develop delicious recipes for this blog.
Print
Easy Sheet Pan Caramel Apples
- Prep Time: 30 Minutes
- Total Time: 30 minutes
- Yield: 15-20 Servings
- Category: Dessert
- Method: No-Bake
Description
Sheet Pan Caramel Apples are the ultimate fall dessert! Made with thin apple slices, caramel dip, and all your favorite toppings … this fun version of the classic treat has the same delicious taste, without all of the hassle. It’s easy to make, super customizable, and perfect to serve a crowd at any fall gathering.
Ingredients
- 4–5 large apples
- 13.5 oz caramel dip, about 1 cup
- Toppings: M&Ms, Oreos, peanuts, chocolate chips, rainbow sprinkles, raisins, etc.
Instructions
- First thinly slice the apples. I like to use this method of cutting apples to get flat slices.
- Next line a large sheet pan with parchment paper. Add the apple slices to the sheet pan in neat rows. I squeezed as many slices as I could on to the baking sheet, 6 down and 12 across.
- Then add the caramel dip to a microwave safe bowl. Heat in 15 second intervals, stirring between each one, until the caramel reaches a pourable consistency. Don’t heat too quickly.
- Pour the caramel over the sliced apples. Next use a spatula to gently spread evenly over all of the apples. You have to be delicate here or the apples will be flipping and sliding all over the place.
- Once the caramel is spread, add all of your favorite toppings. I separated the sheet into 6 different sections for 6 different toppings – mini M&Ms, crushed Oreos, chopped peanuts, chocolate chips, rainbow sprinkles, and raisins. Add however much of each you’d like. Check out my full post for more delicious topping ideas.
- Place the sheet pan in the refrigerator for 15-30 minutes before serving. This will solidify the creamy caramel sauce a bit and chill the apple slices.
- Serve and enjoy!
I love how simple and delicious this recipe is! Caramel apples are one of my favorite treats, and slicing them makes them so much easier to share. Can’t wait to try this for a fall gathering! Thank you, Kay! 🍏🍬
Can’t wait to try this for a fall gathering! Thank you, Kay! 🍏🍬
This recipe looks absolutely delicious and so easy to make! I love the idea of caramel apple slices—perfect for fall gatherings. Can’t wait to try this out! 🍏🍬
These sheet pan caramel apple slices look amazing! I love how easy they are to make and that they’re a fun twist on traditional caramel apples. Can’t wait to try this recipe for our next family movie night! Thank you, Kay!
Wow, this recipe looks so simple and delicious! I love that it’s a healthier twist on caramel apples. Can’t wait to try it out with my kids this weekend!
What a fantastic idea to make caramel apples so easy! I love that you sliced them for better sharing and snacking. Can’t wait to try this recipe at our next fall gathering! Thank you for sharing! 🍏🍬
These sheet pan caramel apples look absolutely delicious and so easy to make! I love how you sliced them for a fun twist. Can’t wait to try this recipe with my family this weekend! 🍏🍬❤️
I love the idea of making caramel apples easier with this sheet pan method! It’s such a fun twist on a classic treat, and the sliced version makes it perfect for sharing. Can’t wait to try this out for my fall gatherings! Thanks for the recipe, Kay!
These Easy Sheet Pan Caramel Apples look amazing! I love how simple the recipe is, and the idea of slicing the apples makes them perfect for sharing. Can’t wait to try this out for my next gathering!
What a fantastic recipe! I love how simple and delicious these caramel apple slices look. Can’t wait to try making them for my next gathering! Perfect fall treat! 🍏🍬
These sheet pan caramel apple slices look amazing! I love how easy and fun this recipe is. Perfect for fall gatherings! Can’t wait to try it out with my kids! 🍏🍬
I absolutely love this idea for caramel apples! The sheet pan method makes it so much easier to make and serve, especially for gatherings. Can’t wait to try this with different toppings too! Thanks for sharing such a fun and delicious recipe!
These easy sheet pan caramel apples look absolutely delicious! I love how simple the preparation is, and slicing the apples makes them perfect for sharing. Can’t wait to try this at my next gathering! Thank you for the recipe!
This recipe looks delicious and so simple! I love the idea of using sheet pan caramel apples for a fun and easy dessert. Can’t wait to try this out for my next gathering! Thanks for sharing!
These Easy Sheet Pan Caramel Apples look absolutely delicious! I love the idea of slicing them for easier sharing and enjoying. Can’t wait to try this recipe at my next gathering! Thank you for such a fun and tasty post!
I love this idea! Sheet pan caramel apples make such a fun and easy dessert. Can’t wait to try this recipe at my next gathering—thanks for sharing!
I love how simple and delicious these sheet pan caramel apples look! Perfect for fall gatherings. Can’t wait to try this recipe with my kids! Thanks, Kay!
These sheet pan caramel apples are such a fun and easy twist on a classic treat! I love how convenient the slices are, perfect for sharing. Can’t wait to try this recipe for my next fall gathering! 🍏🍬
This recipe looks amazing! I love how simple and fun it is to make caramel apples using a sheet pan. Can’t wait to try this out for a sweet treat! Thank you, Kay!
I love how easy these sheet pan caramel apples are! Such a creative way to enjoy classic caramel apples without the fuss. Can’t wait to try this recipe with my family for our next movie night! 🍏🍬
Absolutely love this idea! Sheet pan caramel apples are such a delicious and fun twist on a classic treat. Can’t wait to try making them for my next gathering! Thanks for sharing this easy recipe! 🍏🍬
This recipe looks absolutely delicious and so easy to make! I love the idea of using sheet pan caramel apples – perfect for serving a crowd. Can’t wait to try it out! 🥳🍏
In simple terms, GG 789 is commonly associated with a digital identifier, platform name, or coded term used in online environments.
I love that you sliced them for better sharing and snacking. Can’t wait to try this recipe at our next fall gathering!
I absolutely love this idea for caramel apples! The sheet pan method makes it so much easier to make and serve, especially for gatherings.
I separated the sheet into 6 different sections for 6 different toppings – mini M&Ms, crushed Oreos, chopped peanuts, chocolate chips, rainbow sprinkles, and raisins. Add however much of each you’d like.
The detail that lands for me is “same delicious taste, without all of the hassle.” You kept the fun, messy charm of caramel apples but made them actually shareable, which is I also ended up opening R Ranch Markets next weekly ad afterward because it carries the same thread a little further.
The detail that lands for me is “same delicious taste, without all of the hassle.” You kept the fun, messy charm of caramel apples but made them actually shareable, which is I also ended up opening R Ranch Markets next weekly ad afterward because it carries the same thread a little further.
This recipe looks absolutely delicious and so easy to make! I love the idea of caramel apple slices—perfect for sharing or snacking. I can’t wait to give it a try this fall! Thanks for sharing!